When you can’t send crucial business-related emails, which could have extremely serious repercussions, QuickBooks could not connect to the email server issue appears. It could decrease your productivity and perhaps result in the loss of crucial data files. The most common reason for QuickBooks Desktop Webmail’s inability to produce invoices is due to incorrect webmail preference settings. When utilizing the QuickBooks Desktop application to send emails, a lot of people run into the problem. For further information and simple solutions to the problem, carefully follow the directions in this article.
What leads to QuickBooks could not connect to the email server error
Some of the most frequent reasons for the error include the following:
- You used an invalid password or form of identification to attempt to access your email account.
- You are not connected to the internet, or your internet connection is down or unavailable. Your email server settings are incorrect.
- The QuickBooks Desktop application is not currently installed with the most recent version.
- QuickBooks’ connection to the email server is compromised due to improperly adjusted Internet Explorer preferences.
How can I fix QuickBooks could not connect to the email server error
Users should take the assistance of the below-given factors to fix this error that obstructs QuickBooks from connecting to the email server.
Fix 1: Make changes to Webmail Preferences
- Open the QuickBooks Desktop application first.
- After that, proceed to Preferences from the Edit menu.
- After that, pick the option to Send Forms.
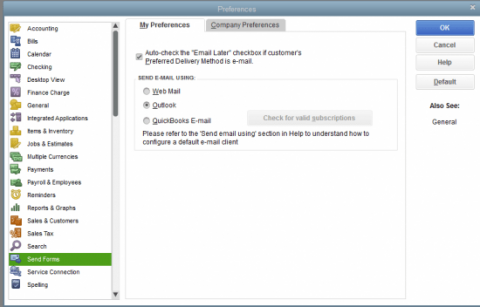
- Under My Preferences, select the email account from which you send emails.
- Make an immediate click on the Edit option.
- After that, select the option to Edit Email Info.
- Next, move on to the SMTP Server Details.

- Enter the proper server name and port number in the required fields.
- Look at the most often used email server addresses for further details (POP3, IMAP, SMTP).
- After saving the changes, try sending an invoice via QuickBooks Webmail once more to check if the issue has been resolved.
Fix 2: Changing Internet Explorer to Default settings
Altering the Internet Explorer settings to default settings can also get the QuickBooks Could Not Connect to Email Server issue. The steps for the same are as follows:
- At first, run Internet Explorer.
- Once Internet Explorer has loaded, click on Internet Options (top-right corner).
- Select Internet Options by tapping on the gear icon in the top right corner.
- Pick advanced thereafter.
- The next step is to hit on the option to Restore Advanced Settings.
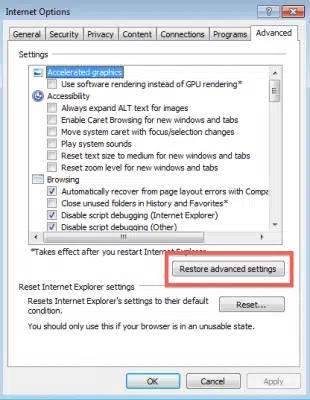
- Then click on Ok.
- To check if the error has been fixed, close Internet Explorer and send an email.
Fix 3: Update QuickBooks
Updating QuickBooks requires users to follow the directions given below:

- Open the QuickBooks Desktop program first.
- Next, select the Update QuickBooks link found in the Help menu.
- Select the updates that you want to download right away.
- Following that, select Get Updates from the menu.
- Select Update to complete the update procedure.
- Keep an eye out for when the updating procedure is complete.
- Send an email after you’re done to see if the QuickBooks program was able to fix the problem.
You may also read : What Are The Best Freelance Writing Sites To Find Jobs?
Conclusion!
The various measures listed in this article should fix QuickBooks Could not connect to email server. If you face any hindrances, you don’t need to worry about. Just give us a call at 1 800 761 1787 and get your queries fixed in no time.