Whether you want to attend a webinar or enjoy listening to music on Spotify, Wavlink extenders are a great companion to get online tasks accomplished without interruption. Not only this, the extender gets introduced with a firmware upgrade so that you can have a beautiful internet experience. The LED lights on your Wavlink WiFi extender indicate the status of power and signal strength. However, these LED lights can disturb your sleep at the night. Isn’t it? What to do then? Well, this post will help you out.
Wavlink allows you to turn off LED effects on your Wavlink WiFi range extender so that you can have a peaceful night. How you can do that? This is what we will discuss here. So, stick to reading.
Steps to Turn Off LED Effects on Wavlink Extender
- Power Up Your Extender
Find a wall socket near the host router and plug your Wavlink WiFi range extender into it. Press the Power button and check whether the power LED on your WiFi extender is stabilized or not.
Just in case the power LED is not stable, chances are that the extender is not getting an adequate power supply. It can happen due to a damaged wall socket. Therefore, plug your Wavlink WiFi extender into another wall outlet to ensure a steady power supply.
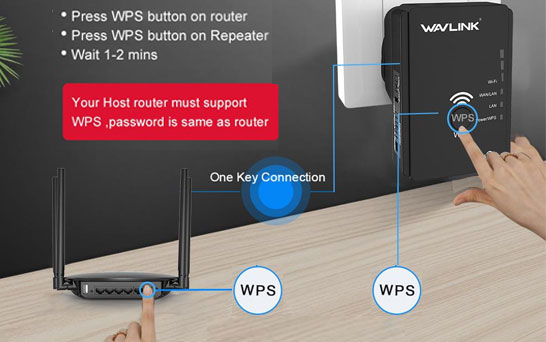
- Connect WiFi Devices
The next step is to create a connection between your Wavlink WiFi extender and the host router. Therefore, grab a damage-free Ethernet cable and insert its one end into the port of the Wavlink range extender and another into the router. However, the connection needs to be finger-tight.
You also have a choice of connecting your devices using a wireless source. Just, mind the distance between them. It should neither be minimum nor maximum.
- Access the Wavlink Login Page
Now, you need to access the Wavlink extender login page. Therefore, shift your attention to the PC and switch it on. As soon as your PC becomes ready to use, open a web browser. You are free to use any popular web browser. The only thing you need to keep in mind is that it should not be running on an outdated version.
Thereafter, navigate the cursor to the address bar of the web browser and type the default web address of your Wavlink extender into it. Afterward, press the Enter key. You will be taken to the official login page of the Wavlink WiFi range extender.
- Log in to Your Wavlink Extender
The range extender login page will prompt you to enter the Wavlink WiFi extender password. So, enter the login password of your Wavlink range extender along with other required details. Click the Log in button.
Note that the default password of your range extender is case-sensitive. Thus, you will have to capitalize letters wherever necessary. Also, if you have ever altered the password in the past, consider using it to get success with the Wavlink login process.
- Turn LED Off
The moment you get logged in to your WiFi device, the dashboard displaying a few tabs will come into view. Here, select the Setup tab and let the window get redirected to a new page.
Once there, select the LED Control option and switch the LED button to the OFF position. Save the changes you have made to your Wavlink range extender.
In this manner, you can turn off the LED status on your Wavlink WiFi range extender. Now, you need not sacrifice your precious sleep just because your Wavlink extender LEDs are flashing.
In the Nutshell
Hopefully, the above discussed guidelines will help you in turning off the LED status on your Wavlink WiFi range extender. If yes, then shoot a word of appreciation in the comment section. Just in case you want to manage other settings of your WiFi extender, stay on the Wavlink setup wizard and tweak the settings the way you fancy.